
You are using an out of date browser. It may not display this or other websites correctly.
You should upgrade or use an alternative browser.
You should upgrade or use an alternative browser.
Question for those that ever had back problems.......
- Thread starter Coldchi
- Start date



I've had my back pains flare up this past week and these exercises actually helped me.
Please do them gently!
1. Spinal Decompression
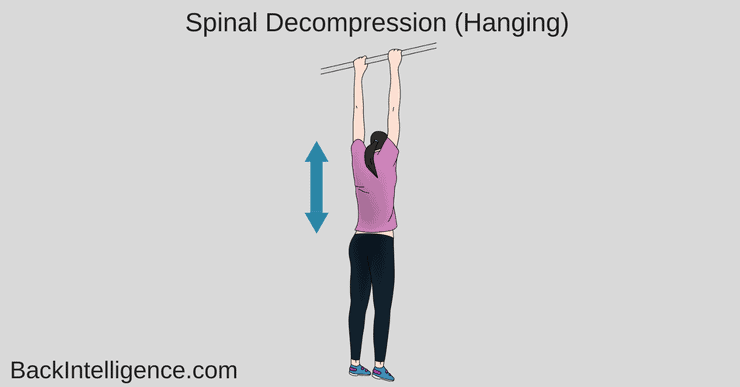
How it helps – Spinal decompression should be the very first thing you do to treat a herniated or bulging disc because it essentially creates space between your vertebrae, and thus takes pressure off the discs.
How to do it
– Use a bar or the top of a door (or anything you can hang from) and allow your body to “just hang”.
– Hang for 30 seconds and do 3 sets.
– If you feel worse doing this technique stop and try some of the other exercises instead.
2. Standing Extension
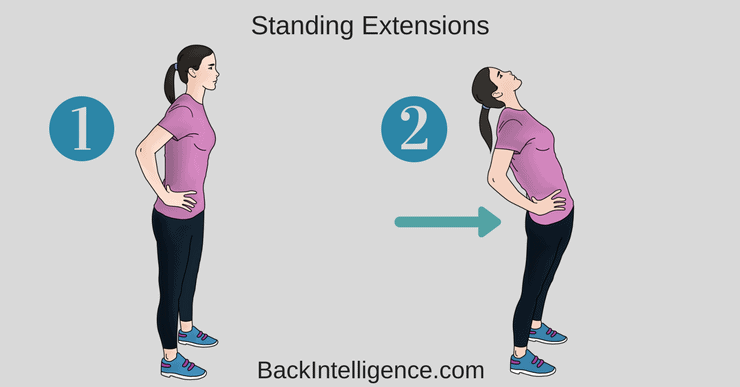
How it helps – This standing extension helps reverse what you do on a daily basis (hunching)… Since most bulging discs and herniated discs are caused by poor posture and repeated flexion of the spine (esp bending fwd in bad posture), this stretch helps push the disc back to neutral position.
How to do it
– Begin this exercise by standing up with good posture. Now take both hands and place them on both sides of your lower back. Now with the help of your hands push your pelvis forward and extend your spine back. Follow the extension with your neck so that you end up facing the ceiling.
– Start with 10 repetitions and do 2-3 sets.
– This one is particularly great to do when you need a break from sitting at your desk…
3. Half Cobra Pose (Prone Lumbar Extension)
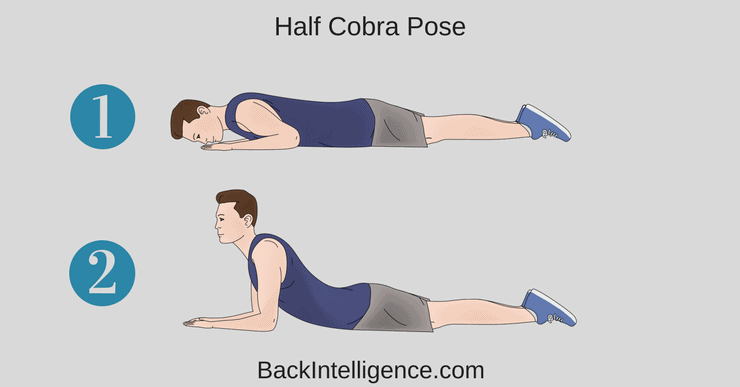
How it helps – The Half Cobra Stretch helps to push the disc material back towards the center of the inter-vertebral disc to allow for improved healing. The goal of repeated lower back extension is the “centralization of symptoms”, which basically means pain that travels down the affected leg to the foot should come back up closer to the low back – which will in turn alleviate the pain.
How to do it
– Begin this exercise by lying on your stomach (prone position) and slowly prop yourself up on your elbows while keeping your hips in contact with the floor.
– Hold the prop-up position for 10-15 seconds before returning to the prone position (lying face down).
– Gradually increase to holding the end position for 30 seconds. Aim for 10 repetitions of this stretch.
** Initially, you may not be able to tolerate this position very well, so make sure you start slowly and carefully.
4. Full Cobra Pose (Advanced Extension)
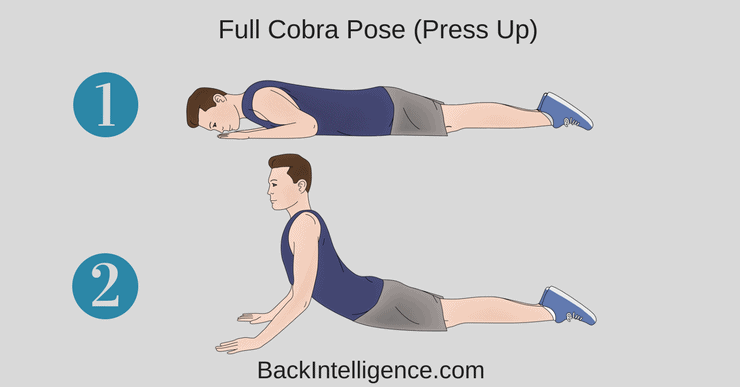
How it helps – This stretch is based on the same principle as the half Cobra pose above. This advanced extension helps to push disc material back towards the center of the intervertebral disc, with the goal of alleviating pain symptoms.
How to do it
– Once you’ve mastered the half cobra pose, you can increase the difficulty by moving to the advanced version of this stretch. Begin this exercise by lying on your stomach in the prone position (lying facing down) and slowly press up on your hands while keeping your pelvis in contact with the floor and lower back relaxed.
– Hold the prop-up position for 10 seconds. Aim for 10 repetitions of this stretch.
– Eventually try to hold this pose for longer if it feels good (20-30 seconds).
5. Cat-Cow
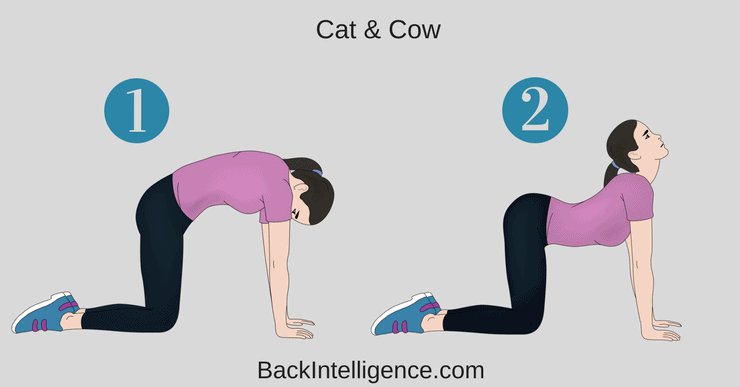
How it helps – This is one of the most popular herniated disc exercises. By combining two yoga poses, the cat-cow stretch can help to relieve pressure on the herniated disc by opening the intervertebral disc space. It also improves mobility of the spine, which may help to relieve disc herniation pain and speed recovery.
How to do it
– Begin this stretch on your hands and knees. Inhale and let your stomach “drop” towards the floor as you look up towards the ceiling.
– Follow this by exhaling and slowly rounding your spine while pressing into the floor with your hands and slightly curving your neck to look at your feet.
– Aim for 10 repetitions of this stretch and do 2-3 sets.
Related: Watch the Cat-Cow Stretch Video
Exercises 6 and 7 are meant to help stabilize and align your spine so that you don’t get herniated discs in the future.….
6. Bird Dog
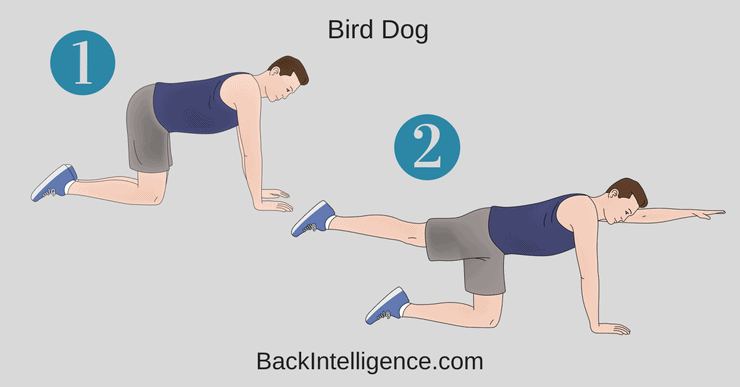
How it helps – This exercise will help strengthen and stabilize your lower back and deep spine muscles. This will help you to maintain a good posture and avoid future episodes of herniated discs.
How to do it:
– Begin on your hands and knees with your hands positioned under your shoulders and knees positioned under your hips.
– Raise your left arm and reach it forwards until it is aligned with your torso; at the same time, kick your right leg backwards until is it aligned with your torso.
– Hold this position for 2-3 seconds before slowly returning to the starting position.
– Repeat with your right arm and left leg.
– Alternate sides for 10 repetitions and do 2-3 sets.
** Ensure that your head, neck, and back maintain a neutral alignment to minimize stress on your neck.
7. Plank
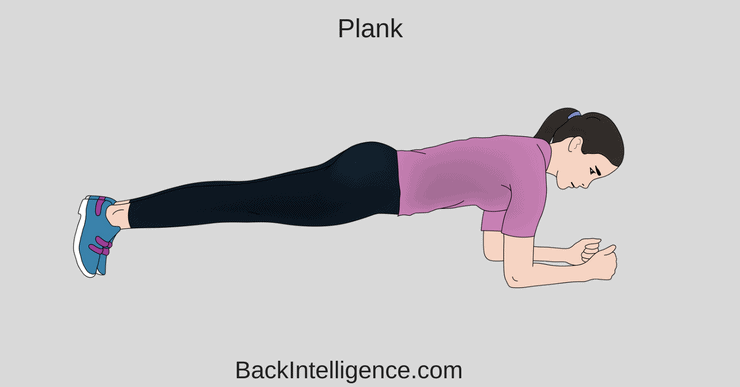
How it helps – Just like the bird dog, this “Core” exercise will help bring your pelvis into right position by strengthening the deep spinal muscles and glutes (butt muscles).
How to do it
– Begin lying on your stomach with your forearms against the mat.
– Engage your core and lift your body so that you are resting on your forearms and toes.
– Hold the plank position for 20-30 seconds.
– Aim for 5 to 10 repetitions of this exercise.
– When you’re ready, increase the intensity by increasing the time you hold the plank in 10 second increments.
** Ensure to keep your back straight throughout the entire exercise.
https://backintelligence.com/herniated-disc-exercises/
Please do them gently!
1. Spinal Decompression
How it helps – Spinal decompression should be the very first thing you do to treat a herniated or bulging disc because it essentially creates space between your vertebrae, and thus takes pressure off the discs.
How to do it
– Use a bar or the top of a door (or anything you can hang from) and allow your body to “just hang”.
– Hang for 30 seconds and do 3 sets.
– If you feel worse doing this technique stop and try some of the other exercises instead.
2. Standing Extension
How it helps – This standing extension helps reverse what you do on a daily basis (hunching)… Since most bulging discs and herniated discs are caused by poor posture and repeated flexion of the spine (esp bending fwd in bad posture), this stretch helps push the disc back to neutral position.
How to do it
– Begin this exercise by standing up with good posture. Now take both hands and place them on both sides of your lower back. Now with the help of your hands push your pelvis forward and extend your spine back. Follow the extension with your neck so that you end up facing the ceiling.
– Start with 10 repetitions and do 2-3 sets.
– This one is particularly great to do when you need a break from sitting at your desk…
3. Half Cobra Pose (Prone Lumbar Extension)
How it helps – The Half Cobra Stretch helps to push the disc material back towards the center of the inter-vertebral disc to allow for improved healing. The goal of repeated lower back extension is the “centralization of symptoms”, which basically means pain that travels down the affected leg to the foot should come back up closer to the low back – which will in turn alleviate the pain.
How to do it
– Begin this exercise by lying on your stomach (prone position) and slowly prop yourself up on your elbows while keeping your hips in contact with the floor.
– Hold the prop-up position for 10-15 seconds before returning to the prone position (lying face down).
– Gradually increase to holding the end position for 30 seconds. Aim for 10 repetitions of this stretch.
** Initially, you may not be able to tolerate this position very well, so make sure you start slowly and carefully.
4. Full Cobra Pose (Advanced Extension)
How it helps – This stretch is based on the same principle as the half Cobra pose above. This advanced extension helps to push disc material back towards the center of the intervertebral disc, with the goal of alleviating pain symptoms.
How to do it
– Once you’ve mastered the half cobra pose, you can increase the difficulty by moving to the advanced version of this stretch. Begin this exercise by lying on your stomach in the prone position (lying facing down) and slowly press up on your hands while keeping your pelvis in contact with the floor and lower back relaxed.
– Hold the prop-up position for 10 seconds. Aim for 10 repetitions of this stretch.
– Eventually try to hold this pose for longer if it feels good (20-30 seconds).
5. Cat-Cow
How it helps – This is one of the most popular herniated disc exercises. By combining two yoga poses, the cat-cow stretch can help to relieve pressure on the herniated disc by opening the intervertebral disc space. It also improves mobility of the spine, which may help to relieve disc herniation pain and speed recovery.
How to do it
– Begin this stretch on your hands and knees. Inhale and let your stomach “drop” towards the floor as you look up towards the ceiling.
– Follow this by exhaling and slowly rounding your spine while pressing into the floor with your hands and slightly curving your neck to look at your feet.
– Aim for 10 repetitions of this stretch and do 2-3 sets.
Related: Watch the Cat-Cow Stretch Video
Exercises 6 and 7 are meant to help stabilize and align your spine so that you don’t get herniated discs in the future.….
6. Bird Dog
How it helps – This exercise will help strengthen and stabilize your lower back and deep spine muscles. This will help you to maintain a good posture and avoid future episodes of herniated discs.
How to do it:
– Begin on your hands and knees with your hands positioned under your shoulders and knees positioned under your hips.
– Raise your left arm and reach it forwards until it is aligned with your torso; at the same time, kick your right leg backwards until is it aligned with your torso.
– Hold this position for 2-3 seconds before slowly returning to the starting position.
– Repeat with your right arm and left leg.
– Alternate sides for 10 repetitions and do 2-3 sets.
** Ensure that your head, neck, and back maintain a neutral alignment to minimize stress on your neck.
7. Plank
How it helps – Just like the bird dog, this “Core” exercise will help bring your pelvis into right position by strengthening the deep spinal muscles and glutes (butt muscles).
How to do it
– Begin lying on your stomach with your forearms against the mat.
– Engage your core and lift your body so that you are resting on your forearms and toes.
– Hold the plank position for 20-30 seconds.
– Aim for 5 to 10 repetitions of this exercise.
– When you’re ready, increase the intensity by increasing the time you hold the plank in 10 second increments.
** Ensure to keep your back straight throughout the entire exercise.
https://backintelligence.com/herniated-disc-exercises/

You need a new bed.

I left the health food store earlier and was told about this. Been in sciatica pain for three weeks now...I will give the results...all natural.

Did it work?

Look Into your mattress
Also yoga has helped my my lower back problems.
Yes, as men we have to stretch everyday, literally. Yoga will help a lot also decompressing the spine by just hanging from the chin-up bar or hanging inverted will help a lot too.
Abdominal workouts really help your back and strengthen your core. The chin-up bar is a godsend. Do body weight exercises i.e hanging leg raises.
Last edited:

Yes, as men we have to stretch everyday, literally. Yoga will help a lot also decompressing the spine by just hanging from the chin-up bar or hanging inverted will help a lot too
Abdominal workouts really help your back and strengthen your core. The chin-up bar is a godsend.
Oh i gotta start doing this....
drink more water. most back pain is your kidneys screaming for water .
This is MAJOR!!! Especially in the morning. when we wake up from sleep we are dehydrated


Could be a pinched nerve in the back.
Im going through it now. Go get it checked out soon.
It could develop into an infection.
If your on your feet a lot at work or walking on hard ass concrete might wanna get some dr shols.
I’m going through some shit with my back rn. So don’t sleep. Get that shit checked ASAP!
Im going through it now. Go get it checked out soon.
It could develop into an infection.
If your on your feet a lot at work or walking on hard ass concrete might wanna get some dr shols.
I’m going through some shit with my back rn. So don’t sleep. Get that shit checked ASAP!

Good discussion and suggestions, everyone.

yoga has helped my my lower back problems.
This nigga

DO NOT KEEP A WALLET IN YOUR BACK POCKET, IT EVENTUALLY
THROWS YOUR SPINE OFF FROM YEARS AND YEARS OF SITTING ON IT
Once I stopped doing that my Back & Neck pain STOPPED

THROWS YOUR SPINE OFF FROM YEARS AND YEARS OF SITTING ON IT
Once I stopped doing that my Back & Neck pain STOPPED

This is very true, but degenerative or bulging discs and sciatica feel completely different than kidney aches from dehydration though. If anybody has a bad back they can tell what's spinal and what's not.This is MAJOR!!! Especially in the morning. when we wake up from sleep we are dehydrated
Excellent tip, nonetheless!

Agreed. Get rid of the bulky wallet.DO NOT KEEP A WALLET IN YOUR BACK POCKET, IT EVENTUALLY
THROWS YOUR SPINE OFF FROM YEARS AND YEARS OF SITTING ON IT
Once I stopped doing that my Back & Neck pain STOPPED
Amazon product ASIN B07DF8QM88
I had what I think is this last week.Could be a pinched nerve in the back.
Im going through it now. Go get it checked out soon.
It could develop into an infection.
If your on your feet a lot at work or walking on hard ass concrete might wanna get some dr shols.
I’m going through some shit with my back rn. So don’t sleep. Get that shit checked ASAP!
I did stretches every few hours where you cross your leg, sitting, by putting your ankle on top of your thigh. Push down on your knee that's crossed and try to bend your upper torso a bit forward as much as possible.
What I found ironic as well was the left leg cross made my right side of my back feel better. Weird...
Like this

Good point about the wallet - throws the alignment off.
Speaking of pain, interesting Paula Abdul interview on the subject.
You are definitely gonna have to stretch. As painful as it might be. I was in your position a few months ago. It was hard to get out of bed, it hurt to lift myself up or sit up. I couldn’t bend down to tie my shoes without it hurting.
Earlier this year I had gained a bunch of weight and fucked myself up jogging stepping off the curb and that knocked a disc loose. It wasn’t too bad but I had to do a lot of stretching. I never thought I could be in that much pain stretching but it’s necessary. I went to the Dr not a chiropractor they said had I not come to see them it could be gotten worse or slipped out even more.
Getting my ass back in shape now because I had another injury again recently but this time my knee. I know it’s because I was lazy the last year til now. I’ve been having hella problems.
Earlier this year I had gained a bunch of weight and fucked myself up jogging stepping off the curb and that knocked a disc loose. It wasn’t too bad but I had to do a lot of stretching. I never thought I could be in that much pain stretching but it’s necessary. I went to the Dr not a chiropractor they said had I not come to see them it could be gotten worse or slipped out even more.
Getting my ass back in shape now because I had another injury again recently but this time my knee. I know it’s because I was lazy the last year til now. I’ve been having hella problems.
Guess it was just sporadic. All this week I've had no issues regardless of whatever position I sleep in.
Glad to hear it. A year later - any further issues, or have they lessened considerably?
You are definitely gonna have to stretch. As painful as it might be. I was in your position a few months ago. It was hard to get out of bed, it hurt to lift myself up or sit up. I couldn’t bend down to tie my shoes without it hurting.
Earlier this year I had gained a bunch of weight and fucked myself up jogging stepping off the curb and that knocked a disc loose. It wasn’t too bad but I had to do a lot of stretching. I never thought I could be in that much pain stretching but it’s necessary. I went to the Dr not a chiropractor they said had I not come to see them it could be gotten worse or slipped out even more.
Getting my ass back in shape now because I had another injury again recently but this time my knee. I know it’s because I was lazy the last year til now. I’ve been having hella problems.
Hope things improve with the knee, Mello.

Just an update on my back issues.
I got 6 steroid epidurals in my back in 2018. None of them worked.
This year I was ready to get surgery to deal with my bulging discs. Went to a surgeon and he said, even though I have 2 bulging discs in my lower back, it's my sacrum area that is my problem.
He said he would operate on me to deal with the bulging discs(outpatient, minimally invasive), but he recommended physical therapy to deal with my sacrum. He felt that the operation would not stop the pain I'm dealing with.
Physical therapy is changing my life. The stretches that I'm doing are really doing the trick. Almost pain free. It's not overnight, but you feel relief right away.
The therapist kept telling me that if you work in an office, to get a chair with excellent lumbar support. He felt that was key to maintain a healthy back.

I got 6 steroid epidurals in my back in 2018. None of them worked.
This year I was ready to get surgery to deal with my bulging discs. Went to a surgeon and he said, even though I have 2 bulging discs in my lower back, it's my sacrum area that is my problem.
He said he would operate on me to deal with the bulging discs(outpatient, minimally invasive), but he recommended physical therapy to deal with my sacrum. He felt that the operation would not stop the pain I'm dealing with.
Physical therapy is changing my life. The stretches that I'm doing are really doing the trick. Almost pain free. It's not overnight, but you feel relief right away.
The therapist kept telling me that if you work in an office, to get a chair with excellent lumbar support. He felt that was key to maintain a healthy back.
I just fell in love with this woman after hearing that story...
The spinal cord is no joke. Take care of yourselves BGOL Brothers
I just fell in love with this woman after hearing that story...
The spinal cord is no joke. Take care of yourselves BGOL Brothers
Agreed. Take care of the back, spine, etc.
As for Paula ... always liked her. Fun personality and has had her ups & downs over the years (solo career, American Idol judge, short-lived reality show).
https://en.wikipedia.org/wiki/Paula_Abdul#Personal_life
https://en.wikipedia.org/wiki/Hey_Paula_(TV_series)
I really believe, not only from my experience but other friends who I know who have pains, stretches helps better than any pills or other things.The stretches that I'm doing are really doing the trick. Almost pain free. It's not overnight, but you feel relief right away.
The therapist kept telling me that if you work in an office, to get a chair with excellent lumbar support. He felt that was key to maintain a healthy back.
Aleve, Motrin, Doans does nothing for me. My pains aren't muscular I don't believe. Think it is a nerve being pinched.
I have two types of pain, or two areas. One is directly on my spine and the other is right at the top of my pelvic bone on my back at the hip.
Both my previous posts with the stretches help tremendously.
Key is I think also is to do them even when you are feeling great and have no pain for months on end. Do them as a prevention and think it may just help to keep the pain at bay.
I am a stretching believer. I agree with you. Make them a part of your daily routine, in pain or not.I really believe, not only from my experience but other friends who I know who have pains, stretches helps better than any pills or other things.
I have two types of pain, or two areas. One is directly on my spine and the other is right at the top of my pelvic bone on my back at the hip.
Both my previous posts with the stretches help tremendously.
Key is I think also is to do them even when you are feeling great and have no pain for months on end. Do them as a prevention and think it may just help to keep the pain at bay.
I got in a car wreck back in may, have 3 herniated discs with horrible sciatica pain. I did the therapy for 2 months no help. The only thing that would relieve the pain for a few hours was to exercise and stretch. I got a back injection done and it helped alot, but im still exercising and getting my core strength back to before the wreck.
I got in a car wreck back in may, have 3 herniated discs with horrible sciatica pain. I dod the therapy for 2 months no help. The only thing that would relieve the pain for a few hours was to exercise and stretch. I got a back injection done and it helped alot, but im still exercising and getting my core strength back ti before the wreck.
Keep it going, MM. All the best with the recovery & healing.
I am a stretching believer. I agree with you. Make them a part of your daily routine, in pain or not.
Agreed. Flexibility and range of motion is important as we get older. Been more consistent with resistance band training of late too. Need to have a set routine that I follow, instead of the occasional inconsistency with it.
Key is I think also is to do them even when you are feeling great and have no pain for months on end. Do them as a prevention and think it may just help to keep the pain at bay.

Anyone here have arthritis, or parent(s) with it? Pops deals with it for one knee. Thankfully it has gotten better in recent years. Less falls or near falls.
In my feet, shoulders, right hip, I'm beginning to think, and knees for certain. It hurts to flex my hip when I get out of the car when my hip is stationary and has to flex when I step out, and when I try to cross my leg over my knee.Anyone here have arthritis, or parent(s) with it? Pops deals with it for one knee. Thankfully it has gotten better in recent years. Less falls or near falls.

Some nights, when I attempt to roll over it feels like my hip is coming out of the socket. I don't feel any bone to bone rubbing that I can tell though.
The pain reminds me of the Tendonitis that I would get in my thumb...certain movements would feel like it became disjointed or jammed really badly.
In my feet, shoulders, right hip, I'm beginning to think, and knees for certain. It hurts to flex my hip when I get out of the car when my hip is stationary and has to flex when I step out, and when I try to cross my leg over my knee.
Some nights, when I attempt to roll over it feels like my hip is coming out of the socket. I don't feel any bone to bone rubbing that I can tell though.
The pain reminds me of the Tendonitis that I would get in my thumb...certain movements would feel like it became disjointed or jammed really badly.
Damn. The certain thumb movements feeling like it's jammed or disjointed. The hip must be frustrating too.
My brother had shoulder surgery in his pre-teens. Had a dislocation, and then some follow-up dislocations with minor injuries via sports. Got it fixed and thankfully has been problem-free for just over 20 years. Re: injuries. I'm surprised I haven't damaged my knees more. Jogging, track & field (100m, 200m, and 4x100m), basketball, soccer, etc. Only had a deep sprain playing basketball out near the back driveway as a teen. Thought for sure the years of running on gravel, dirt, rubber, hardwood, pavement, and grass would have been more problematic. Instead it was a lay-up and knee twist? Crazy. Thought I had torn something.

How long have you had your mattress. what type is it? Do you work on your feet during your shift?Here's the scoop. For the past 2 weeks, I wake up to the most severe back pains, and its usually between 3am and 4am. Sometimes, its so bad i can't fuckin move, and when i do try to move it hurts even worse. Its been times where it has taken me about 2-3 minutes just to sit the fuck up. The only way to alleviate the pain is to sit completely upright in the bed and apply a heating pad on my back as well. And i just try to sleep the next few hours sitting upright. Usually this pain remains after I'm up and walking around for about an hour, then goes away. I don't feel the pain any more for the entire day. Even when i lay back down in the bed to go to sleep, I'm fine. But as soon as it gets between 3 & 4am,....im woken up out of my sleep by this pain.....feels like im stabbed in the fuckin back. And its not my lower back.....more like the middle part. My wife thinks maybe we need a new bed. But im open for suggestions.


Similar threads

- Replies
- 2
- Views
- 111

- Replies
- 43
- Views
- 1K

- Replies
- 8
- Views
- 280


- Replies
- 0
- Views
- 84
