
Creating your own video channel
Setting up your own video channel sounds expensive, a lot of work and really complicated, but it is not as hard as it sounds and it certainly does not cost a lot of money. In fact, it is very cheap if you know where to go and how to do it! Apart from creating your videos (obviously), it consists of 4 steps which are explained in great detail.Definition of a video channel
I sometimes refer to YouTube, Brightcove, VideoJug, MySpace etc.. as video channels, but they are actually Video Portals (or networks if you like), containing video channels. In the context of this tutorial, I mean that you can have your own video channel, like you can have it on YouTube, with a couple of differences:
- You are in total control over the quality.
- No redirects to the video portal as is the case with YouTube and most others if you click on the view window in the player.
- You are in total control over the video player, which has the same options as most video channels.
- You are in total control over the look of the site and you add features as you see fit.
- You do not get traffic from your favorite video portal, unless you create special promotion videos which you upload there (I would recommend that in any case).
- You do not get into the featured videos of your favorite video portal, unless you keep creating specials for that portal in order to get traffic to your site (again, I would recommend doing that).
- If your videos are immensely popular and therefore use up more then 5 Terrabytes bandwidth per month, you may have unexpected extra costs.
Here are the steps that need to be taken, I explain every step in detail:
- Open an account with a hosting provider which allows you to play streaming video & setup your domain.
- Press a button to install WordPress or Joomla.
- Look for a good template to use. Download a script and a Flash video player to stream your videos.
- Upload your own videos to your web space and brand your video player.
Which content management do I need?
OK, so now that we know what we need to know, we can install a content management system. But which one?
Please have a look at this post: Joomla vs WordPress before you go further. If need be, take a couple of days to think about it.
Press a button to Install a content management system
Finding a template theme for your system
In this stage we need to find the right template for your content management system, whether it is WordPress or Joomla. Using the default template of the installation is a bad idea for 2 reasons:
- Google, the God of search engines, has decided that if you use the default template of a CMS, you probably are a lazy marketer wanting to make money by creating tons of mini sites. Thus, you end up on the bottom of the pile, so to speak.
- The default themes do not look exactly great and in most situations, they do not reflect the type of product or information you want to promote.
If you don’t want to dive into the code and peace of mind is important, a commercial template will save you time and aggravation, especially for Joomla.
What kind of template are we looking for? For a video channel, I would avoid templates with a large header because you want to have as much “real estate” as possible. Real estate is the available space on your homepage, for content and eventual ads. In this part, I discuss both WordPress- and Joomla templates separately below with links to commercial and free templates.
Joomla templates
Joomla templates are complex due to the nature of the system. As a result, this system has attracted more commercial designers then WordPress.
Consequently, you will notice that many templates and plugins are for sale. Quite a few sites claim to give away free templates, but in reality, they try either to sell commercial templates or ask you to become a paying member. In short, it requires some research to find real free templates and finding good ones is tricky business. If you get tired looking for them, leave it for a day and continue your quest the next day. Finding a suitable template is very important.
A commercial template is typically priced between $35 to $50. If you are an entrepreneur, this money is well spent to avoid the aggravation of having to try out free templates. Membership sites are fine for web designers as they will need more then one template for their various projects, but if you just have one site, these memberships cost you more then buying a single template. I have been roaming around myself and in my personal opinion, Joomlashack.com has an excellent choice of properly made templates which are relatively easy to adapt to your own needs. Support is good and timely, as I experienced myself. Another good one is joomlashine.com
I am sure there are others, equally good, but I just happened to like templates from the ones mentioned above and after close examination of the source code, all was well.
Here is a list of websites you might want to check out:
Free templates:
http://www.joomlahut.com
http://www.joomla24.com
http://www.joomlashine.com (Free and commercial)
Commercial templates
http://www.joomlashack.com (individual templates)
http://www.joomlajet.com (paid membership)http://templateclub.mambosolutions.com/
http://templateclub.mambosolutions.com/ (paid membership)
If you selected a template with a header image, you will need to change it because you will want to have a unique look. This will be covered in Part 4 of this series.
If you have found the template you like, and you are not interested in WordPress, download it onto your computer, you can jump over the WordPress part and proceed here to install your Joomla theme >>
WordPress theme templates
Those of you who have their system installed on DreamHost are lucky, because there are already a whole bunch of templates installed from which you can select the one you like in the administration section. You might want to have a look at them first before you go look on the Internet.
With WordPress themes, it is a bit different compared to Joomla because this community consists primarily of volunteers contributing free themes. If your installation of WP does not contain extra themes that are useful to you, the best place to start looking for them is actually on the site of WordPress itself. http://wordpress.org/extend/themes
On the left-hand side, you will find templates organized by type. That is to say: you can look for a 2 column, 3 column etc..which is very convenient. Look under Popular Tags on the left. (You may have to scroll down a bit).
There you click on the type of template theme you are interested in and then make you selection. There are other sources as well. To name a few:
http://www.templatesbrowser.com
http://www.amazingwordpressthemes.com
http://wpthemeland.com
If you type WordPress themes in Google, you will find tons of sites with free templates. Since there are so many themes which are good enough to start from, I never tested the commercial ones, so I cannot give any advice on those.
The look of WordPress templates is easier to adapt then Joomla because the structure is simpler. Yet, it does require knowledge of the native scripting if you want to adapt how menus display. This is not as difficult as you might think but if you do not want to jump into the code yourself, you can ask a web designer or webmaster with knowledge of WordPress to adapt the menus for you. If you are planning to create a video blog, you will have little changes to make as the standard menu structure probably is already suitable for you.
If you selected a template with a header image, you will need to change it because you will want to have a unique look. This will be covered in Part 4 of this series.
When you have found the template you like, download it onto your computer and remember where you saved it. It is now time to install the template.
Installing the template theme
With Joomla, this is surprisingly easy, because you can upload a theme directly from your browser into the system. With WordPress, you need to use an external application, namely a FTP program like FileZilla or SmartFTP.

Either way, you will need FileZilla or any FTP application at some point in the process, so I suggest to install it, regardless if you use Joomla or not.
Installing the FLV Media player
If you have set up your system with DreamHost, and you selected WordPress, you actually do not need to do this as it is already installed for you. If that is the case, proceed to FLV Media player license requirements >>
But for those who have another web account or selected Joomla, I will explain how to get the player setup here:
First we download the FLV media player itself. FLV stands for Flash video. Go to www.jeroenwijering.com/?item=JW_FLV_Media_Player and download the player. It is called mediaplayer.zip and it consists of a couple of files and a folder, including the swobject.js.
We only need to upload player.swf and swobject.js to our webspace. The rest, you keep on your local computer, in case you want to brand the player later on (place a log and such)..
For this, we need to use the FTP application we installed earlier for the upload of the theme template (See the Installing FileZilla (FTP application) & upload WordPress template video tutorial in the member area).
- Open FileZilla and connect with your domain.
- Then, in the right-hand pane, which contains the remote files (those on your webspace), make sure you are in the folder where you can see the index page (index.php).
- Click in a free area in the pane with your right mouse button and select New > Folder.
- Call the folder embed.
- Locate the folder of the player on your computer and select player.swf and swobject.js
- Drag both files over the embed folder in the righthand pane.
- Wait until uploading is finished.
- That’s it!
Don’t be afraid, you do not need to read the file or fiddle around in it. It is just a question of downloading and uploading to your site. Go to http://code.google.com/p/swfobject/ and there you download the latest swobject. At the time of writing, this is http://swfobject.googlecode.com/files/swfobject_2_1.zip, but you should check if there is a later version on that page. For the inquisitive types among you: you can find all the documentation on the swobject here: http://code.google.com/p/swfobject/
FLV Media player License requirements
It depends if you are going to use your video player commercially or not. DreamHost works with the player from Jeroen Wijering, which is an excellent player with many options and it is the most widely used player on the Internet because of its excellent features. The license requires a small fee of 30.00 euros (at this time of writing) if you want to use the player in a commercial context.
If you want to brand your video player as your own and use it on unlimited projects, the fee is higher. If you use it in a non commercial project, you do not need to pay anything.
To determine when your project is commercial or not and how much you are supposed to pay, I advise you to go to the site www.jeroenwijering.com and read the license agreement. If in doubt, just contact Jeroen and ask. I do not know him personally, but he appears to be a reasonable guy and you do not want to end in a Courtroom arguing about semantics, do you?
The last part of this series: Preparing your video for streaming, uploading and embedding the video, branding your site and the video player.
Preparing your video for streaming
Ideally, a video is up to10Mb-15Mb in weight, with a maximum data rate of 200Kb to 250Kb per second. That way, nearly everyone with a reasonable connection will be able to view your video without glitches.
Most video editors have the option to control the data rate. Data rate is the amount of kilobytes per second that is transferred from your server (where your website resides) to the clients computer. This is how we control the “streaming” of your video. For the record, FLV movies are not really streaming movies, they more or less simulate the process. For real streaming you need special server software. But this method works fine, so don’t lose any sleep over it. Unless you want to build a mega site, you won’t need special server software.
What format to use for my videos?
The typical format for a video channel is FLV, or Flash for Video. The reason is that most viewers can view this type of videos because the plugin used to display the video is installed on more then 98% of the computers worldwide.
In most cases, the video from your camcorder is not FLV, but another format like AVI, WMV, MOV, MPEG, MP4, etc … Therefore, it needs to be converted to FLV. Exporting video to FLV is a typical process that is practically the same on every video editor. By showing you how this works with the videos below (found in the member area), you will be able to do it in every video editor, although they may have additional native options.
In the member area is a set of video tutorials related to FLV export:
- Use FTP to upload video for FLV conversion
- Convert uploaded video to FLV in the DreamHost panel (for those of you who have an account with them. )
- Exporting to FLV in Vlog It-Adobe
- QuickTime Pro (Mac & PC)
- Camtasia, Techsmith (PC)
- Adobe Premiere (Mac & PC)
- Adobe AfterEffects (Mac & PC)
- Final Cut Express (Mac)
- Final Cut Pro (Mac & PC)
- Vlog It (PC)
- iMovie (Mac)
- …
http://www.brothersoft.com/afree-mov-to-avi-flv-mpeg-wmv-converter-download-79111.html
I didn’t test it myself because it would overwrite existing codecs already installed on my computer and I’m sure the commercial codecs are better then the free ones, so I didn’t want to risk it at the moment of working on this tutorial. That doesn’t mean you shouldn’t give it a try. Best create a System Restore Point (Windows) before installing any video converter on your computer, so that you can restore the original configuration if things turn out wrong. If you do not know how to do that, here is a short tutorial from Microsoft.
2 options to upload a video
At this stage, I presume you have a FLV video ready for publishing. OK, let’s upload it then! We have 2 options to do that, namely:
- Via the admin section of WordPress or Joomla,
- Via FTP
1. FTP
Personally, I prefer FTP because it is much faster then uploading via your browser. Another reason is that there are restrictions on the weigth you can upload via your content management system. To overcome this limit, you’ll have to involve a web developer or server master to raise the maximum limit if you want to upload videos bigger then 10MB or so. You also may want to check with your hosting provider. They might not let you change the limit.
Either way, in the member area is a video tutorial Use FTP to upload a video for fLV conversion. This shows how to upload a video through FTP with the free FTP appplication FileZilla.
Working with, and installing an FTP application is also covered in Installing FileZilla (FTP application) & upload WordPress template in Creating your own video channel – part 3.
2. Admin section uploads
To upload via the admin section of WordPress, view the video in the member areaPlacing a video in WordPress & brand the player , where it is explained how to upload a video via the admin section of WordPress. It also shows how to install a good FLV plugin and how to brand your player (more details below).However, make sure the video you want to upload is not bigger then 10Mb or the upload probably fails.
Branding your player
You can do several things to brand the player as your own. The most significant option is to add a logo that floats over your videos and set a poster image for every video separately. A posrer image is the images that shows when your vidoe loads, initially.
There are other options as well, but we won’t discuss those here as they are too advanced at this stage, but they will be covered in later tutorials.
If you want to jump ahead and know all about the configuration of the player, here is all the detailed information on Jeroen’s site, the author of the Flash video Player >>. (I hope his site is up again).
Branding your site
The easiest way to brand your site is to create an image that is exactly the same size as the current logo or image at the top of the site. In order to do that, you need to know 3 things:
- Where is the image
- What is it called?
- What are the dimensions in pixels (width, height)
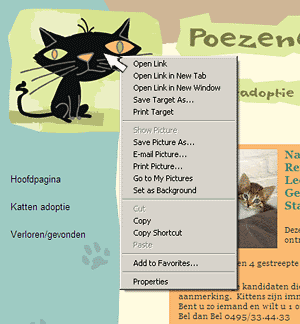
You will see something like this in Iexplorer:
And in FireFox, you see this:
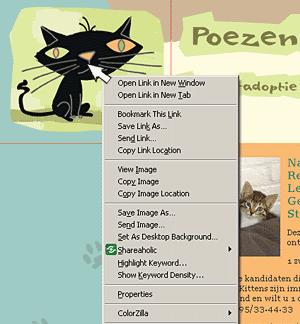
In both browsers, and in fact in nearly all browsers, you will see the menu option Properties in that popup. Select it to see the details of the image.
You will get something like this:
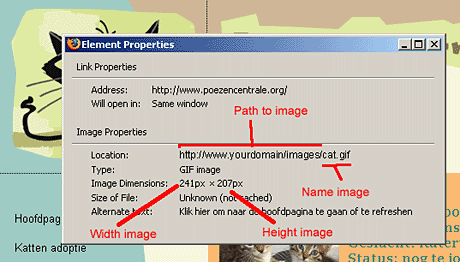
At Location, you see the path to your image. Select that line, copy it and paste it in a text file.
The part including the last Slash “/” is the path, the rest is the name of the image.
Below that, you will find the width and height of the image.
Jot that down as well. You have now all the details you need. Again, right click on the image and select, Save as.
Save it wherever you want and if you are familiar with image editors, then open it with your image editor and adapt the image according to your needs. Otherwise, consult a graphic designer and let him/her design a header for you. You will need to give this person the details you just wrote down.
Either way, when the image is finished, you have to upload it to your web space, in the folder where the original came from. In fact, you will overwrite the original image. That way, you do not need to change the code in the template and your new image will show up on all pages (unless the template has different images for some section (consult the manual of the template for this).
There is a video tutorial in the member area: Branding your WordPress site which visually shows this process in the member area under the section Creating your own video channel – part 4.
(all video tutorials from previous articles will move to the member area soon).
HELP, I don’t get image information when I hover over a header image! What now?
In Joomla and some WordPress themes, logo images are often displayed as background images and therefore difficult to find out the details you need.
Video Content Outlets
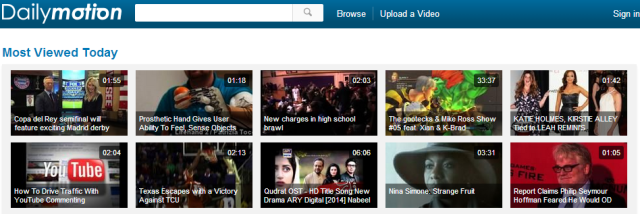
In terms of users, DailyMotion is the second largest online video site in the world. With over 112 million monthly unique visitors, DailyMotion offers huge potential for your video to go viral and reach millions of people.
The interface of the website is quite similar to what YouTube used to look like in the past. You will see trending videos on the homepage and a search bar at the top.
To upload the videos, simply register for an account on DailyMotion with any valid email id and start uploading.
- Maximum allowable uploading size of any video is 60 minutes in length and 4 Gb in size with a resolution of HD 1080p.
You can also earn money from your video but for that, you will have to be a part of DailyMotion OpenVOD program.
Pros
- Has less harsh rules than YouTube on removing videos, but that can also be detrimental and uploaders might be free to upload whatever content they want
- Features the same layout so you will get used to it right away
- Professional quality videos at your viewing disposal
- Same lists of video categories to make it easier for you to navigate around.
- High-definition uploads will only be available for pro users
- Is not popular in the U.S., even though it has accumulated quite a reach in Europe
- Video resolution limit is capped at 1080p
Vimeo
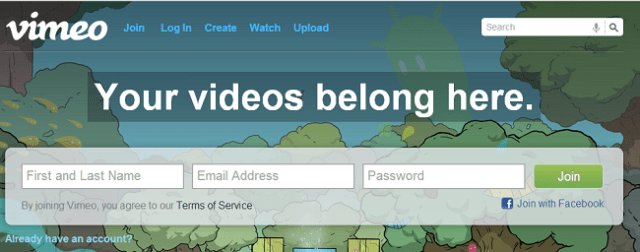
After DailyMotion, next in the list is Vimeo. The interface of the website is very beautiful. On the homepage, you will see a big sign-up form and if you scroll down, you will find some really good videos handpicked by the staff. Also, there are no ads before, after or in-between videos, unlike YouTube.
Uploading videos on Vimeo are free but up to a certain extent,
- With a free account, you can upload 500 Mb of content weekly. You can upload any number of videos and of any duration but the weekly content shouldn’t exceed 500 Mb.
- For upgrading the limit up to 5 Gb per week, go with the paid plan starting at 9.95 USD per month.
- And the PRO plan with limit up to 20 Gb per week is billed annually only, 199 USD per year.
Pros
- Focus more on the video the user is streaming and provides less distracting elements in the background.
- A place for creative content creators to showcase their work to others
- Encourages high-quality filmmakers to provide their magic
- Vimeo homepage is a delight for the eyes
- The website has a limit of 500MB per week only when uploading videos and this for each user
- Video limit can be upgraded, but that is only capped at 5GB and will require a monthly fee
flickr

flickr is majorly used for hosting images but It also lets users upload and share videos, a lot of people are not aware of this fact.
For uploading a video, sign up for your free account and start uploading videos in the same way as you upload images on flickr. You can upload videos in HD quality too.
Flickr free account comes with 1 Tb memory and pro account comes with unlimited storage space, free from ads and provides detailed stats.
Features wise there’s not much to look in to flickr when it comes to videos.
Pros
- Very clean and simple UI will allow first-timers to feel very welcome when searching for a variety of content to stream
- Videos can be uploaded freely without any obstacles
- Video uploads are limited to 90 seconds
- Only two videos with a time limit of 90 seconds can be uploaded
Veoh
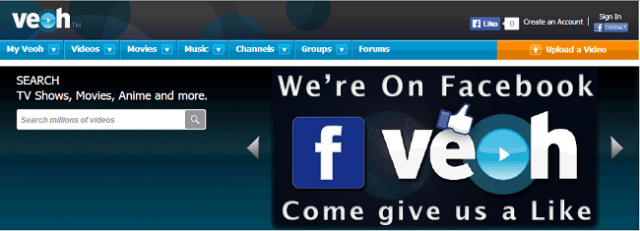
Veoh is again a very good alternative for YouTube. You can upload videos of any length and share them instantly. The site is having a clean UI with a lot of social features like adding friends, personal messages, forums, groups (where you can share your videos and reach more people) etc.
However, the search isn’t up to the mark which makes the browsing experience poor.
Pros
- Clean user interface with a lot of social features present so that you are able to engage with your friends and interact with groups and forums
- Videos of any length can be uploaded and instantly shared
- Search capability is less than a pleasing experience, meaning other users might revert to finding other alternatives
Metacafe
Metacafe is the oldest player in the video sites and is live since 2003, even before YouTube came in to existence. The site serves more than 40 million unique visits every month.
The homepage of the site is different from every other video site and categories are well framed for better browsing experience.
Currently, Metacafe isn’t open for uploading new videos. (Reason is not known to us)
Pros
- Great platform for community-based content to be added
- Attracts around 40 million unique viewers, which is not so bad considering there is little to no garbage content being uploaded
- 90-second videos mean comprehensive and detailed videos will not be provided to viewers
- Scarce viewership in comparison to YouTube
Blip.tv
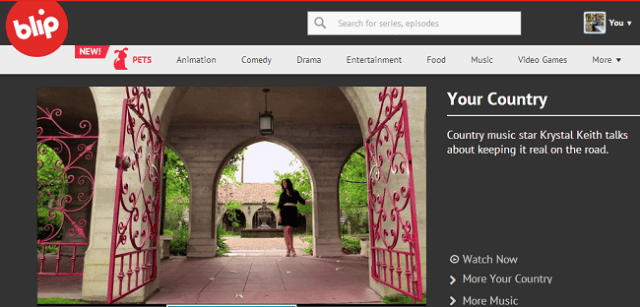
Blip.tv provides awesome browsing experience. There’s a lot of high-quality video content available on the site in the categories ranging from animation, comedy, drama, movies, entertainment to tech, how to, news, sports etc.
Currently, Blip.tv isn’t open for new user registrations so you won’t be able to upload anything but you can browse a lot of quality content, find inspiration and learn new stuff.
Vube
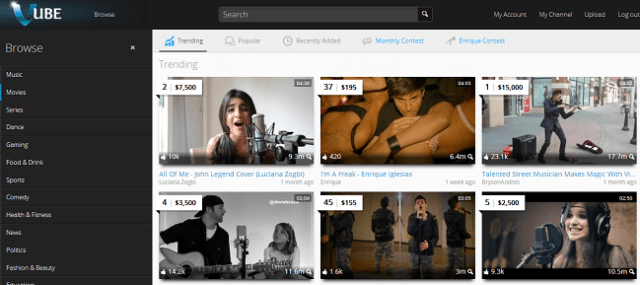
Vube is the newest video sites we have on this list. The site went live in early 2013 and within a few months, It has reached in the list of top 100 most visited websites of the world. The site is driving a massive amount of traffic from its aggressive marketing strategies.
The UI is clean and simple to understand, the browsing experience is also decent.
You can freely upload videos on this site after registering for your free account, uploading process is quite simple to follow. The site is currently running contests to make sure that the users generate higher quality content.
Vevo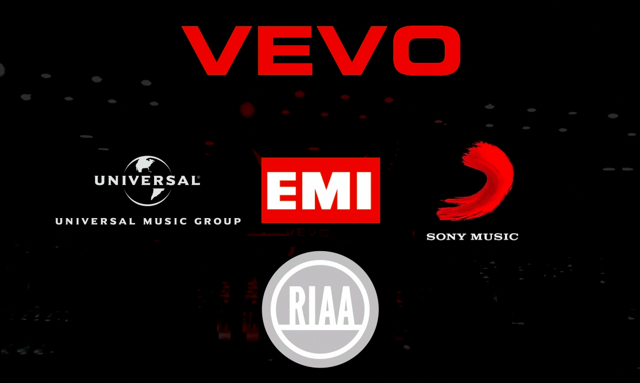
If you love music videos, then you’d better bookmark Vevo as your ‘go to’ streaming website because this YouTube alternative will deliver to you fast, hard, and swiftly. With an endless supply of music videos literally at your fingertips, you can always go here when you want to do absolutely nothing but submerge yourself in lyrics, vocals, and sound.
They always say music is therapeutic, and Vevo will become your primary health center when you’re feeling down and out. Unfortunately, it does not present diversified content like YouTube so you might be disappointed with what you find when you browse around it for the first time.
Pros
- A treasure for those that want to enjoy an endless repository of music videos
- High-definition content will always be guaranteed
- ‘Simple to use’ website interface will have you hooked on the streaming platform in no time
- Cannot be as diverse as YouTube in terms of content thanks to limitation of the content-type being uploaded
- You cannot upload your own music videos so it might become a popular alternative for some people
Twitch

Twitch started out as a concept at first but quickly became a favorite for viewers and content uploaders whose strict motto is to watch gaming videos and nothing else. For millions of internet users out there, Twitch is ideal for viewing ‘live broadcasting’ videos but its popularity is very pale as opposed to YouTube.
In terms of payout, Twitch might not be the suitable alternative but if you absolutely adore gaming videos, then this is the platform you should get stuck to right away.
Pros
- Very impressive in attracting gamers and content uploaders alike to the website
- Game-based content available in massive amounts
- Great for watching live gaming videos
- Payout is far less compared to YouTube
- You cannot rewind videos
- Streaming performance might be a tad bit slower compared to other websites
The Internet Archive
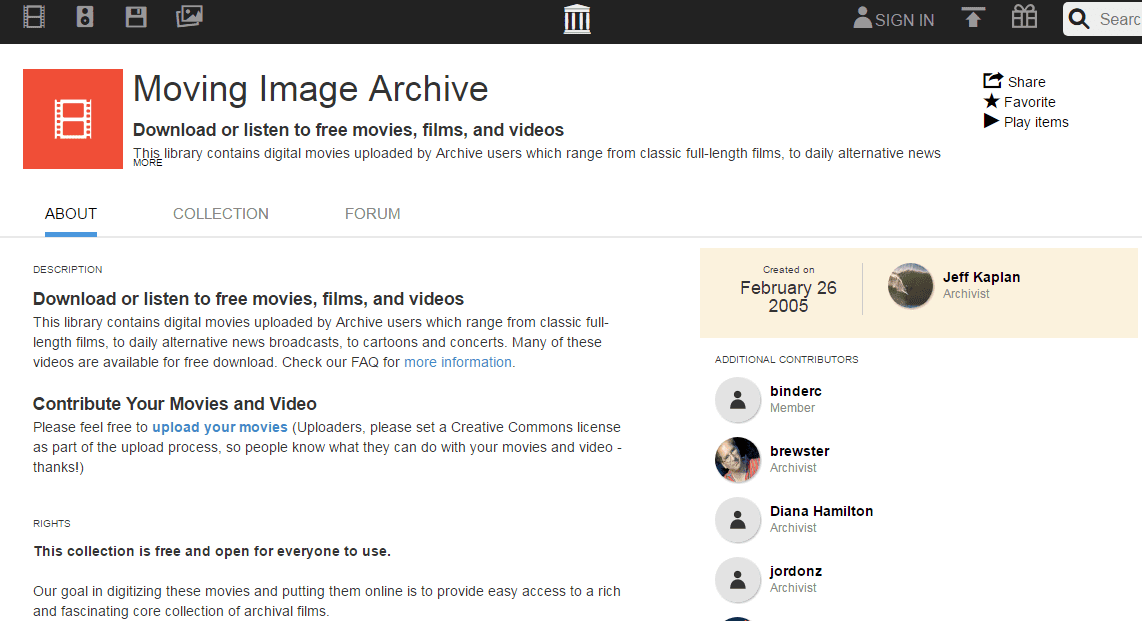
The name might sound like a storage platform because that is exactly what it is; The Internet Archive is part of the WayBack Machine and houses a lot of content from back when content uploaders and viewers were very few in number. If you want to state your requirements of watching a wide-range of documentaries, TV series, movies and more, we highly recommend that you start following The Internet Archive religiously.
Pros
- Huge library of videos present ranging from documentaries to TV series, movies and others that are hard to come by on other platforms
- Users can also upload their own content freely
- You might not find a whole lot of new content present at The Internet Archive when compared to other streaming and uploading websites
9Gag TV

If you’re on Facebook and Twitter then there is absolutely no way you have not come across the 9Gag brand. The channel provides copious amounts of entertainment in the form of images, GIFs, memes, and so much more, but here is where things get even better. 9Gag TV is a section that houses an abundant level of videos and though some of them might be NSFW, you will get your dose of entertainment the moment you fire up this channel.
Pros
- If pure entertainment is what you are seeking for then there is no better place than 9Gag
- NSFW videos are also a part of the content, so be careful what you click on
- Users might kill hours of precious time by engaging in entertainment videos
Photobucket
Photobucket is similar to Flickr but presents more options to users ranging from a varied amount of content. It does host a very impressive repository of user-generated videos, but it will still take time for it to provide a higher collection of content and in a broader capacity.
Pros
- Stellar browsing experience
- High-quality content can be uploaded, with a diversified repository readily available
- Limited content, for the time being, might not encourage a high level of viewership
You may not think Facebook as a video sharing website or one of a YouTube alternative sites. However, the truth is Facebook is a social media network that allows their users to upload and share videos. Uploading videos to Facebook is very simple. There are also support tools that you can use to optimize your video including thumbnails, tags, meta description and the likes. On top of that, you can upload HD videos without any downscaling.
You can also do live videos on Facebook easier than going live on YouTube or other desktop platforms. Before you start creating videos for Facebook, you can read and learn from our social media video tips to get better results.
While doing an open comparison between Facebook and YouTube is not really fair because one emerges as a social media and the other one as a pure video sharing platform, there is a video advertising aspect that we can compare to help us find out which one is better. It’s also worth noting that video posts on Facebook are weighted more than regular text posts by its latest algorithm.
****
Websites like Ted, offer you videos of Ted talks that range across a mixed range of topics — mostly inspirational and you’ll usually end up talking something useful at the end.
Another website is MySpace, which you might remember as the social network in the early 2000s — a predecessor of Facebook, if you may. The website is now heavily investing its resources into coming up with interview-based videos mainly starring celebrities.
Crackle, which is owned by Sony Pictures Entertainment is another option to consider as it houses TV shows like Mad About You, Comedians in Cars Getting Coffee and movies like Rudy, Night of the Living Dead and more.
Congratulations!